Google Analytics…aaahh where to begin?! If you’re an analytics Newbie and reading this post, you’re probably thinking the same thing! If that’s the case, then you have come to the right place. We’re going to teach you the basics of Google Analytics and how to set your account up for maximum success.
If you’ve already set up your Google Analytics account…and then had no clue what to do next…feel free to skip down a few steps to Section Two, to get to the good stuff. Otherwise, we’ll be going over the A to B basics of how to set up your account and privileges, before we get to analyzing your first (useful!) data.
But first – the WHAT and the WHY:
Google Analytics is a free tool offered by Google that allows you to track all of your website traffic and data, and provides detailed statistics on any visitors to your site. It’s a very powerful resource to help you make decisions on your website, content and service offerings. You’ll need to install a small snippet of code on your website, which will activate the analytics on your site and send it back to your Google Analytics account.
We won’t overwhelm you with all of the benefits of implementing Google Analytics on your site, but you can read through them here (and there are a lot)!
SECTION ONE: Let’s Get Started!
Head on over to Google Analytics and set up a new account by clicking Create an Account (or register by signing in with an existing Google account). Once registered or signed in, you’ll get to the setup page. Here are some tips to setting it up:
Account Name: This is just to help you keep track of your analytics accounts if you register more than one under your master account.
Website Name: Again, this is just to help you differentiate between multiple accounts; you can just use your website URL.
Website URL, Industry Category, and Reporting Time Zone are pretty self-explanatory.
Data Sharing Settings: this is completely optional; select the options that make sense for you.
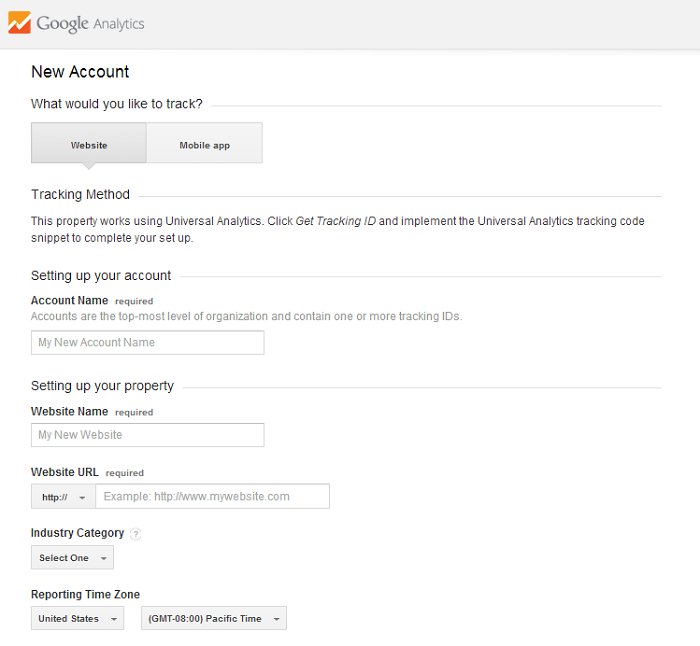
Once you’ve entered all relevant information, click “Get Tracking ID” and agree to the terms of service. Now we can work on installing the tracking code.
Installing the Tracking Code
Installing code?! You?! Don’t worry – this step is actually quite easy. Below is a screenshot of the Tracking ID page that you’ll come across after the initial setup of your account.
![]()
If you’re using WordPress to manage your website, you’ll just need to install the Google Analytics for WordPress Plugin. Once installed, go to Settings and enter the “UA” code. Make sure you enter your unique number exactly as it appears in your Tracking ID page, and save the entry.
Even if you aren’t using WordPress, the process is still quite simple; just follow these easy steps provided by Google:
- Find your tracking code snippet. It’s in a box with several lines of JavaScript in it. Everything in this box is your tracking code snippet. It starts with
<script>and ends with</script>.
The tracking code contains a unique ID that corresponds to each Google Analytics property. Don’t mix up tracking code snippets from different properties, and don’t reuse the same tracking code snippet on multiple domains. - Copy the snippet.
Don’t edit your snippet. Just copy it. You might want to paste it into a text document if you’re worried about accidentally losing or changing the snippet from your clipboard. - Paste your snippet (unaltered, in it’s entirety) into every web page you want to track. Paste it immediately before the closing
</head>tag.
If you use templates to dynamically generate pages for your site (like if you use PHP, ASP, or a similar technology), you can paste the tracking code snippet into its own file, then include it in your page header.
Whichever method you use, make sure you check it afterwards to ensure it was saved correctly. You can verify your setup here, and your website data will begin tracking to your new Google Analytics site within the next 24 hours.
User Privileges
If you have multiple people who need to be accessing your business’ Google Analytics account with admin privileges, you can easily set that up as well. Simply click on the “Admin” button at the top of your Analytics account, and click on the “User Management” link. Add permissions for your new user, filling out the new users’ email address, and selecting all roles to make them administrator. You can choose to give this user admin access to all or some of the profiles set up under your master account; once they receive the email verification with access to the profile(s), they are good to go!
SECTION TWO: Filters, Goals and Linked Accounts
Now that you have your account set up and your Tracking Code installed, it’s time to start playing around with the features of Google Analytics to make sure you are always viewing the most relevant and useful information.
Filters
Filters can be used to remove certain data so it isn’t displayed in one or more of your Analytics profiles. Why is this useful? Here’s one example: you could have multiple employees in your office accessing your website numerous times throughout the day. If you filtered your data to exclude all traffic coming from your offices’ IP address, then your true website traffic number won’t be polluted with this internal access.
(A quick side note if you’re unsure of how to find your company’s IP address: head on over to whatsmyip.org. You can then enter this data directly into your filter to exclude your office network from your results.)
**Before we begin, a very,very, very important piece of information to note: once done, filtered information from a Google Analytics profile cannot be undone. So it’s extremely valuable to have a master profile that contains all raw data so that you don’t permanently lose any data that is being excluded by a profile filter***
You can sort your data using nearly any filter you can think of. Click on Admin and select the Profile you’d like to add the filter to, and click on Filters

From there, click + New Filter, and then Create New Filter. From there, you can either select a Predefined Filter or a Custom Filter, and then select which views you want that filter to apply to.
Save your choices and re-run your new filtered data, comparing it to your original raw master profile (see the “very,very, very important” note above) to make sure your filter is working the way that you want it to.
You can add multiple filters to one profile (ie: filter by IP address, and then by Visitor Campaign) and they will be filtered in the order in which you set them up. If you ever wanted to change this order, you would click Assign Filter Order and then Move Up or Move Down to move your filters to how you want them.
If you want to add or remove an additional filter from a profile, you just need to go into the Apply Existing Filter section and add or remove as you wish. Make sure you click Save to keep your selections.
Goals & Conversions
Goals allow you to measure the true results of your online marketing efforts, and how often users take or complete defined actions. They allow you to track which sources of traffic and which actions lead to the most conversions on your website.
To set up Goals, head to the Admin section, click Goals and then Create a Goal. You can choose from a list of template goals (that have standardized business objectives) or create your own custom goal from scratch.

Here are some types of common types of Goals that are popular to set up: Time on Site, Pages/Visit, URL Destination, or tracking a specific event (such as clicking on a “subscribe” link, or downloading a whitepaper file). After your Goals have been set up for a few days or weeks, head to the Conversions section of your Analytics account to view more information of completed goals and your conversion rates. Goals and Conversions are a necessary tool to help you understand the actions taken by visitors of your website and track trends over time; you can receive all of the analytics data in the world, but it is meaningless if you don’t know how to read it and act on it.
Associating Webmaster Tools & Adwords Accounts
If applicable, you can also associate Webmaster Tools and Adwords accounts to your new Google Analytics account. For Webmaster Tools, you can associate the accounts through your Webmaster Tools homepage; click on Manage site and add Google Analytics property. You then just need to choose the web property that you want to link to the site, and save your selection. This will now allow you to view Webmaster Tools data directly within your Google Analytics reports, and also be able to access Google Analytics reports directly from within your Webmaster Tools account.
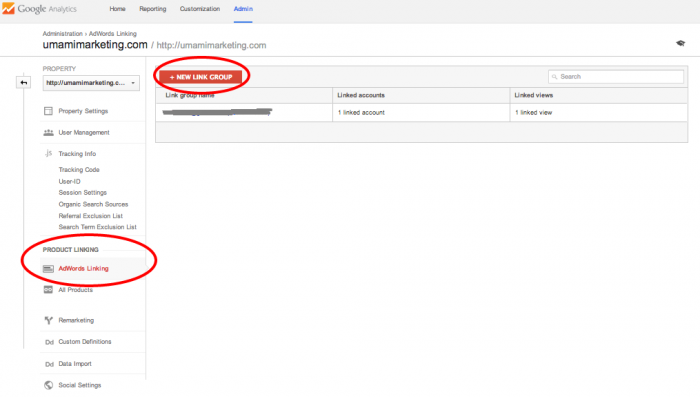
To link Google Adwords to your Analytics account, it’s a similar process: from your Adwords account, click Tools and then Google Analytics. Or, go to your Analytics account first, click Admin, and select the account that you would like to link to your Adwords account; in the “Property” column, select the property, and then under Product Linking click Adwords Linking then the +New Link Group button and follow the instructions.
This Adwords and Analytics connection will allow you to analyze customer activity through your website; it will also allow you to do the following:
- Import Google Analytics goals and transactions into AdWords as conversions
- View Google Analytics site engagement data in AdWords
- Create remarketing lists in Analytics to use in AdWords for targeting specific audiences
- Automatically view your AdWords click and cost data alongside your Analytics site engagement data
Section Three: Get Busy!
We hope you’ve found our step by step instructions useful in setting up/enhancing your Google Analytics account. For additional information on the best dashboards to use, please refer to our earlier post on Top Tips for Effective Dashboards.
Please comment below if you have any additional questions about setting up or improving your Google Analytics accounts. We’d love to help you get the most out of this free tool, as it’s one of our favorites! We hope you enjoy sorting through all of the useful and insightful information that will begin flowing through your Google Analytics account to help take your business to the next level!
About the Author