Your Facebook business page is an extension of your business, and needs to be treated as such. Branding, posting and sharing updates, and engaging with your followers will help increase your audience, and their interest in your company and its products or services. The following 6 steps will help you to not only create your Facebook business page, but enhance it to create a positive customer experience.
Step 1: Create a Page & Choose Classification
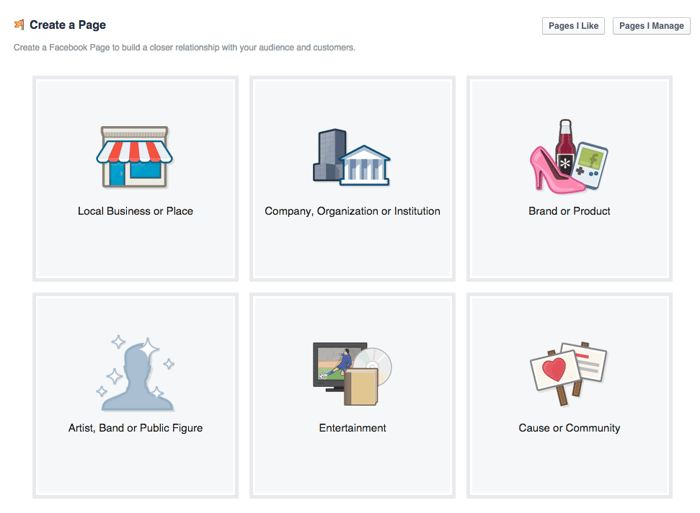
Login to your Facebook account, and click on “Create Page” under the arrow in the top right corner. Next, you’ll be presented with a number of classification options; select the one most relevant to your business.
- Local Business or Place
- Company, Organization or Institution
- Brand or Product
- Artist, Band or Public Figure
- Entertainment
- Cause or Community

Step 2: Choose Your Page Category
The next step involves picking a category that is specific to your industry and filling out some basic information about your business, including your address and phone number.
You’ll also need to agree to Facebook’s Terms & Conditions at this point in order to finalize the set up of your new business page.
Step 3: Add Optimized Business Details
Once you’ve selected your account category, you’ll need to finalize the completion of your business details and information.
- “About” section: you’ll need to come up with an optimized, yet concise, 2-3 sentence description for your company, which shoud include a link to your website. You’ll also pick your “facebook.com/yourcompanynamehere” unique URL; you’re only ever allowed to change this once, so make sure you pick a good one that is unique and relevant to your business or brand.
- Profile Picture: upload the main picture for your page. Square dimensions (180 x 180 pixels) will work best. Make sure it’s a high quality image!
Once you complete these basics, your page will be live. You can choose to add it to your “Favorites”, so it’s easily accessible to log into in the future.Once live, you can also update the Admin options of your page, under “Settings”. Here you can edit your page information, add additional details, change your notification settings, or add other admin roles to your page (if there are other members of your organization who would need to access it).
Step 4: Beautify Your Page
Now that your site is live for the world to see, it’s time to make it pretty! You will already have your profile picture uploaded, but you’ll also need to add your cover photo. The dimensions of the cover photo should be a minimum of 851 x 315 pixels.
If you don’t have an image on hand that matches these dimensions, you should think about hiring a designer to create something visually appealing, or use a photo editing app like Canva. When your cover photo is uploaded, the activity is posted to your timeline; at this point you can choose to edit the description of this update to include a personalized blurb, a tag, or location, to better interest your visitors.
Step 5: Post, Post, Post!
Now that your page is live, optimized, and beautified, it’s time to actually post the content that will draw in the traffic! There are six different types of content that you can post:
- Plain Text status updates
- Photos with captions
- Links with captions
- Videos with captions
- Event pages
- Location check-ins
These different post types will ensure that you’re constantly posting a variety of content forms to your page (and keep in mind that posts with images have been shown to attract up to 37% more engagement than posts without photos). However, it’s still a good idea to test amongst them to see which types gain the most traction in the forms of likes, comments or shares, as every business and every audience is different.
Also, if you’ve posted something you’d like to stay trending on your page, you can click on the grey arrow on the top right corner of each post and choose to “Pin to Top” which will move the post to the top of your page’s timeline for the next week. Use this feature for important updates such as product releases, improvements, or major events or anniversaries.
Step 6: Gain Fans!
Keep in mind that no one will want to like your page if it’s empty. Add some content before sending out the invites, so your page is engaging and interesting to your potential fan base. Once that’s done, share away!
- Invite Facebook Friends: under the option to “Build Audience”, you can “Invite Friends” and tell your current Facebook friends about your page.
- Invite Coworkers/Employees: having your current employees like your page is a big endorsement on its own. Plus, they have their own friends that they can further share the page with, extending your reach even more.
- Add Social Links to Your Website: add social icons to your website and all blog posts, encouraging site visitors to like your Facebook page or share it themselves.
- Add Social Links to Your Email Signature: similarly, adding social icons or links to your Facebook page within your email signature will further your reach to anyone you’re in touch with online.
- Host a Contest or Promotion: one of the easiest ways to promote your new page is to host a sharing content or promotion to drive likes and visitors to your page.
Well, what are you waiting for? If your Facebook business page isn’t already live, you better get on it! And if you do already have an active page, hopefully these tips will help you to enhance and improve it.
For additional help with your Facebook presence, click the link below to get your free Facebook Advertising Guide.


